


Using WhoisAPI services from PowerShell: an invitation
PowerShell is a powerful cross-platform interpreter for scripting that can be used for automating the tasks. On Windows systems in particular, it is the primary and native tool for system administration, data processing, and many more activities. The possibilities range from simple scripts to implement command-line solutions to large, object-oriented tasks.
This blog is an invitation to use WhoisAPI's services in PowerShell. This consists of using RESTful APIs, illustrating the power of the actual services, especially in security and domainer applications. The presentation is aimed at beginners with a very basic background in programming, and no background in PowerShell is assumed. However, experts of PowerShell who have not used RESTful APIs yet, and experts with a UNIX background making their first steps with PowerShell may also find it useful.
Though PowerShell is a cross-platform tool, we will be working on a Windows 10 system. As we will be implementing scripts, we need a development environment or a programmer's text editor. The best approach is to use Visual Studio Code with its PowerShell extension. There is a legacy option to use PowerShell ISE, which is no longer supported but is still a shipping component of Windows, so this might be the easiest approach for a quick start if it is still there on your system. However, the scripts are just text files, so they can be edited with any editor like Notepad.
It is also important to enable scripting on your system. This is disabled by default as it indeed poses some security risks, but in principle it is safe to enable it. It is the ExecutionPolicy that controls this behavior; check e.g. this page, especially if your system complains that ps1's cannot be loaded because scripting is disabled on your system.
A third prerequisite is an account for WhoisXML API's services. Visit https://main.whoisxmlapi.com/signup for the details, a free subscription is available. Upon registration, you will get an API key, a string which will be referred to as API_KEY in what follows: API_KEY should be everywhere replaced with your particular key. We will use the WHOIS and the email verification APIs in the present demonstration.
As a use case, imagine that you are interested in WHOIS data of domains. These data tell you about the owner of the domain, its registration and expiry dates and other similar features. We will implement a basic Cmdlet, a command-line tool that gets us these data points from the API. (WHOIS data can be obtained directly, too, but it has its limitations. For instance, getting WHOIS data for many domains with a high rate is disabled on most WHOIS servers. Also, extracting a single record like the expiry date requires some effort. The WHOIS API overcomes all these.)
As our code will be just a few lines, let's present it as a whole first:
[CmdletBinding()]
param (
      [string] $DomainName
)


$APIKey = "YOUR_API_KEY"

$BaseUrl = "https://www.whoisxmlapi.com/whoisserver/WhoisService?outputFormat=JSON&apiKey=" + $APIKEY +"&domainName="

$URI = $BaseUrl + $DomainName

$APIResponse = Invoke-WebRequest -Uri $URI -UseBasicParsing

$WHOISData = ConvertFrom-Json $APIResponse.Content

Write-Host -Object $WHOISData.WhoisRecord.RawText
Save this with your chosen editor under the name e.g. MyWhois.ps1. The first few lines (up until the closing parentheses) define a command-line argument: we want to run our command in a PowerShell window like this:
.\MyWhois whoisxmlapi.com
and we expect the WHOIS data of whoisxmlapi.com (or any other domain) to appear as an output. The first few lines of the code ensure that the variable $DomainName will take the value we have specified in the command line.
Next, we assign a few variables. $APIKey holds your API key (remember to replace API_KEY with the key received upon registration). $BaseUrl is the endpoint of the API, as specified in the API docs. From these we put together the $URI: the + stands for concatenation, e.g. "apple"+"pear"="applepear". This is the URL which will result machine-parsable WHOIS data.
Now comes the main point: we get the actual data. We do this by using Invoke-WebRequest, which is PowerShell's native tool to call a RESTful API and read out the data in a structured format. The -UseBasicParsing option is needed to avoid dependence on the obsolete dependence on Internet Explorer.
At this point of the code, we have a structured WHOIS record in APIResponse. Finally, we display the RawText field as we want an exactly WHOIS-like textual output. Let's give it a try: in a PowerShell Window, in the directory where the script resides, we can run it:
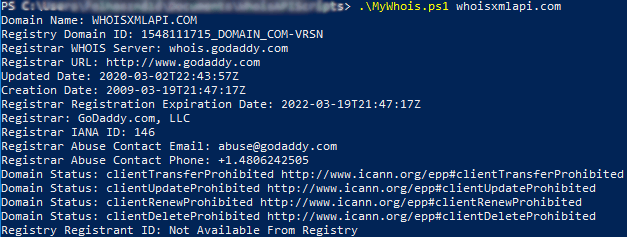
and indeed, we get the WHOIS record for the domain.
But what if we are only interested in the expiry date? Let's replace the last line of the script with
Write-Host -Object $WHOISData.WhoisRecord.ExpiresDateNormalized
Running the script now, instead of the whole WHOIS record we get
2022-03-19 21:47:17 UTC
the expiry date of the domain. Apart from printing it out, there are a tremendous amount of possibilities for programmed processing. You can branch on the date to find domains close to expiry. You may opt for other fields like the registrar's name, consult the API docs to learn more about the data structure. You can loop through domains listed in a text file and check them against any criterion that can be defined in terms of WHOIS data, etc. the number of possible applications is tremendous.
It is also worth noting that WhoisXML API has many other similar services that can be used as easily as this one. As an example, let us present a variant of our code that verifies if an e-mail address specified as an argument can receive e-mails. Such a check could be very important in many applications, from e-mail campaigns to sending automated alerts. (Consult our email verification blog for a deeper understanding of email verification). The desired check can be done with the email verification API; using our previous code as a template and taking a quick look at the API docs we quickly end up with the following code:
[CmdletBinding()]
param (
      [string] $EmailAddress
)


$APIKey = "YOUR_API_KEY"

$BaseUrl = "https://emailverification.whoisxmlapi.com/api/v1?apiKey=" + $APIKey +"&emailAddress="

$URI = $BaseUrl + $EmailAddress

$APIResponse = Invoke-WebRequest -Uri $URI -UseBasicParsing

$VerificationData = ConvertFrom-Json $APIResponse.Content

Write-Host -Object $VerificationData.smtpCheck
When saved under a suitable name, e.g., SMTPVerify.ps1, it will let you know if an address can receive mails:
PS C:\Users\user\Documents\WhoisAPISCripts> .\SMTPverify.ps1 [email protected]
true
PS C:\Users\user\Documents\WhoisAPISCripts> .\SMTPverify.ps1 [email protected]
false
Using this code snippet, you can improve the quality of emails sent to your registered clients by avoiding outgoing mails to non-existent addresses and thereby decreasing the risk of getting to a spam list.
In conclusion, we have demonstrated at a basic level how WhoisXML API's RESTful API services can be used in PowerShell, flawlessly integrating to native Windows solutions and applications of this tool running on other systems like Mac OS X or Linux. If you find this interesting, get your free account and give it a try.